Friday, November 30, 2012

Christmas Tree Felt Board

I know, I know. This website is supposed to be about recipes, right?  I have to admit that I have been stuck in a recipe rut.  With my busy, demanding (did I mention busy?!) toddler, and with the holidays fast approaching, I seem to be relying on the same nine or so recipes.  Hopefully this will pass soon and I can get back to cooking because I miss experimenting in the kitchen!

What I have been doing instead?  Well last weekend we decorated the house for Christmas and my almost two-year-old son is thoroughly enjoying all of the Christmas decorations.  Um, yes, that means that things are being "undecorated" daily in our house.

I decided to create a Christmas tree felt board for "Lolo" so he can decorate the tree whenever he wants.  I had hoped it would prevent him for taking the ornaments off our Christmas tree, but it hasn't.  The Christmas tree felt board is still a hit even though I have ornaments (more by the day) floating around the house as well.  Alas that is life with toddlers, right?

What I enjoy most about watching him decorate his tree is that he has to put the star at the top.  Where do our kids pick these things up? 

Hope you are enjoying the holiday season!

Sunday, November 11, 2012

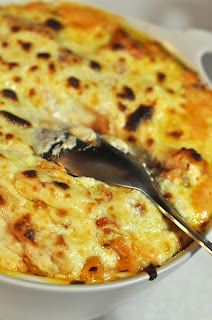
Rosy Mac ‘n’ Cheese

Ok, full disclosure: I did NOT cook this! Nope, fabulous my husband did.  I told my husband the other day that I was in the mood for comfort food, i.e. mac ‘n’ cheese.  He said what he always says, “ok.”  It was Saturday morning and I proceeded to walk out the door to go grocery shopping. 

When I arrived home from the store, I found him and my son sitting in front of the TV, pen in hand, watching America’s Test Kitchen.  It happened that they were making mac ‘n’ cheese on the episode, so dear husband was writing down the ingredients.  Can you say perfect timing?

Now here is the kicker: The version of mac ‘n’ cheese they were making had tomatoes in it.  My husband is allergic, and I mean really allergic, to tomatoes.  I took one look at him and said, “I am not making two different dishes for dinner.”

To that he responded, “Ok, I’ll do it.”

Not cook dinner?  You don’t have to say that twice! 

Not only did I get great mac ‘n’ cheese for dinner, but I didn’t even have to make it.  Talk about a good night! 

As mentioned, this recipe is adapted from America’s test kitchen. 

*If you are not gluten free, use regular pasta and the recipe will still be great.

Rosy Mac ‘n’ Cheese

1 lb gluten free pasta* (I like Trader Joe’s gluten free rotini)
2 cups half & half
1/2 cup chicken broth
1 – 28 oz can of diced tomatoes
4 tbsp oat flour or brown rice flour (or regular flour if you’re not gluten free)
3 tbsp butter
2 cups cheddar cheese, grated
1 cup sharp cheddar cheese, grated

1 tsp salt
1/4 tsp pepper
Dash of cayenne pepper

Preheat oven to 400 degrees.

Cook pasta until it is al dente. Drain and rinse in cold water.  Place in bowl and add can of tomatoes with liquid. Stir thoroughly.  Let sit for 15 minutes, stirring occasionally.  The pasta will soak up all the excess liquid from the tomatoes.

Melt butter in pan over medium heat.  Add flour and stir to create rue.  Once mixture is bubbly and starting to turn light brown, remove from heat.  While stirring, add chicken broth and half and half.  Return to heat, stirring constantly, until boiling. Simmer 10-15 minutes.  Remove from heat and add cheese and seasoning until well mixed. 

Combine pasta and sauce.   Cook in oven for 20-25 minutes, covered if you want all cheesey, uncovered if you like the top crunchy.

Monday, November 5, 2012

Sautéed Butternut Squash with Lemon & Pine Nuts

How did it get to be November already?!?  Wasn’t it  just last week it was getting dark at 8 p.m. and it was 75 degrees out?  Alas, summer is over and Thanksgiving is just around the corner.

As the leaves fall in my front yard, (and no, I haven’t gotten around to raking them yet) I took the time to prepare this butternut squash recipe for my family.  I wanted to share it with you now because this is a very pretty presentation for squash and a great side dish for Thanksgiving.  I modified the original recipe (like I do with most recipes) to eliminate tree nuts because my husband is allergic.
This is a pretty easy recipe, but if you can get someone else to cut up the squash I recommend it because it can be a workout!
This recipe can be made ahead for Thanksgiving and reheated for 30-45 minutes prior to eating.

Sautéed Butternut Squash with Lemon & Pine Nuts
2 tbsp olive oil
1 tbsp butter
1 butternut squash, peeled and cubed
Salt and pepper
1/4 cup loosely packed flat leaf parsley, chopped
3 oz pine nuts, toasted
1-1/2 tsp freshly grated lemon zest
Preheat oven to 350 degrees. Heat oil and butter in a pan over medium-high heat.  Add squash and season with salt and pepper to taste.  Cook, stirring frequently, for 8-10 minutes until squash is lightly browned (the edges will start to soften).  Add pine nuts, lemon zest and parsley and transfer to oven safe bowl. Bake squash for 25-30 min until hot and tender. 
If making this dish ahead for Thanksgiving dinner, sauté squash but do not bake it until just before you are ready to eat, and if it has been refrigerated it will need to bake for 30-45 minutes.

Friday, October 5, 2012

Easy Gluten-Free Crockpot Pot Roast

It is finally crockpot season! I will admit, I’m one of those strange people that use their crockpot when it’s 85 degrees outside. Mostly because I don’t want to stand at the stove to cook!  But alas, summer is over and it truly is crockpot season.

I have been looking for an easy, gluten free recipe for pot roast that actually has some flavor.  I can’t believe how hard it has been to make one that we actually like.  This is an extremely easy recipe to make when you don’t have time to cook, and it’s good!
Easy Gluten-Free Crockpot Pot Roast
2 to 3 lb pot roast (frozen is fine)
1/4 cup wheat free tamari sauce
1 pkg onion soup mix or French onion soup mix (make sure it’s gluten free)
2-3 cups water
Black pepper to taste
Combine tamari sauce, soup mix and water in crockpot. Add pot roast and more water if needed (don’t completely cover the pot roast with liquid).  Sprinkle the top of the pot roast with black pepper.  Cook on low heat for 7-9 hours.

Wednesday, August 15, 2012

Tomato, Cannellini Bean and Tuna Salad


My tomatoes are finally starting to ripen in our garden. Hooray!   I feel so spoiled this time of the year with fresh picked tomatoes every day, and I love coming up with recipes to use them in. 
This is a quick, easy salad that makes a great lunch or light dinner.  I have also added (and will once my are ripe) cucumbers to it and it’s quite good.  I will admit that this recipe originally came from somewhere, but I can’t find it to give credit to the original authors (or tell you the original ingredient list)!  I am not this creative J


Tomato, Cannellini Bean and Tuna Salad

*Note: This portion size is for one person
1/2 can tuna
1/2 can cannellini beans, rinsed and drained
1/2 cup of tomatoes, chopped
3 or 4 sprigs parsley, chopped
Juice from 1/2 lemon (I like mine with a lot of lemon, use less if you don’t want it as tart)
2 tbsp olive oil
Salt to taste

Combine all ingredients. Toss and enjoy!

Thursday, August 9, 2012

Spinach Pie

I love it when the first thing gone on my son’s dinner plate is the vegetables.  I’ve been working hard to ensure that my nineteen month old toddler has a wide variety of veggies in his diet, and let me tell you, it can be challenging!  So I pulled this recipe out of the drawer and decided to try it. 

Spinach pie is so easy, but I haven’t made it in years.  My husband and I both discovered we are allergic to poultry eggs about five years ago.  However, I have since discovered that duck eggs don’t bother us, which is exciting for baking and cooking.  While they can be hard to find, duck eggs have provided me the opportunity to share this recipe with my son. Looks like I will have to try to find them more often!

Spinach Pie

2 pkgs frozen spinach

2 eggs (or duck eggs)

Dash nutmeg

½ cube butter, melted

Parmesan to taste (I used about 1/3 cup fresh grated)

Thaw and drain spinach well.  Mix all ingredients. Place in greased pie dish and bake at 350 degrees for 20-30 minutes or until the edges turn light brown.

Saturday, July 14, 2012

No Stir Chicken Risotto

Ok, ok, I know what the package of risotto says, “stir constantly,” right?  So what am I talking about?  No stir risotto?  Why yes, that is exactly what I’m saying!

Quite a few years ago, my boyfriend (now husband) and I attended a happy hour at the Space Needle in Seattle. It was one of those events where they bring in a chef and demo food and wine with a great view from the observation deck.  The chef they brought in made a risotto.  He said, “I know that many people are afraid of risotto, but really, there’s nothing to be afraid of!” and proceeded to teach us how to make a good risotto.  Needless to say, I am not afraid of risotto.  As a matter of fact, with a little prep work while my son is napping, it’s a really simple dish to make.  And my whole family loves it, so we eat it almost every week. 
Here’s the recipe:

No Stir Chicken Risotto

2 cups risotto
4 cups gluten free chicken broth (I like Costco Chicken Stock or Imagine Organics Chicken Broth)
1 lb chicken thighs
8-10 medium mushrooms
1 onion
Cheddar cheese to taste (I use about 1/2 lb (or 1-1/2 cups grated) of white cheddar)
Parmesan cheese to taste (I use about 1/3 cup, grated)
1/2 tsp Italian herb seasoning
Olive oil
Water as needed

In a 6 qt pot, heat chicken broth until a low boil.  Cube chicken and sauté in olive oil until cooked.  Chop onion and slice mushrooms. Once chicken is cooked, add mushrooms and onion and sauté until mushrooms are soft and onion is translucent.  Add risotto and Italian herb seasoning and mix well (I usually let it cook for about a minute. Don’t let the risotto stick to the pan).  Add heated chicken broth, stir to incorporate, and bring to a simmer.  Place a lid on the pan and let it simmer.
After 10 minutes or so, give it a quick stir to see if the risotto is sticking to the bottom. If it is, add some water (1 cup is usually plenty).  Put the lid back on it.  If it was really sticking, you may want to check it again.  If not, check it at 15 minutes or so.  Cook for 20 minutes or until rice is no longer crunchy. 
Grate the cheddar cheese and parmesan and mix it in. 
That’s it! How easy is that?
Note: To speed up the cooking process, I cube and sauté my chicken separately.  While this is cooking, I cook the mushrooms and onion, then mix it all together and add the risotto. It cuts 15-20 minutes out of the cook time.

Wednesday, June 27, 2012

Gluten Free Restaurants in the Seattle Area

If you are gluten free in Seattle there are lots of restaurant options for you.  I admit, with a toddler at home I am not as likely to go out to eat as I used to, but when I do here are the places I frequent.  Please let me know your favorites and I’ll add them to the list!

Kirkland
Café Veloce
An Italian restaurant in Totem Lake, Café Veloce offers gluten free pizza and pasta in addition to their regular menu.  We especially like this place because it is full of motorcycles (inside the restaurant), and my son loves wheels, so it keeps him entertained.  http://www.cafeveloce.com/
Rikki Rikki
Rikki Rikki is a sushi restaurant located in Park Place Center in Kirkland. It can be packed on weekends and in the summer.  I like it because they offer wheat free tamari sauce as an option (you have to ask for it though, it’s not what’s on the table).  Before I discovered this I used to travel with my tamari sauce when we went out for sushi.  Their sushi is excellent, though it can be pricey. http://www.rikkirikki.com/index.php
Garlic Jim’s Pizza
Who doesn’t love gluten free pizza delivered?  Garlic Jim’s does it well, and if you are lucky enough to have a coupon it isn’t even that expensive.  http://www.garlicjims.com/home/

Bellevue
Maggiano’s Little Italy
This is by far my favorite place to eat out gluten free in Bellevue.  They offer gluten free pasta options, and if you’re looking to make something else on the menu gluten free they will do whatever they can to accommodate you.  Tell them you are gluten free when you arrive and they will have a chef come out to talk with you about your order to make sure it’s right.  Oh, and if you order one of their classic pastas, you get a second one to take home. I love leftovers! Definitely call ahead to make reservations on the weekend; it can be a long wait otherwise. http://www.maggianos.com/en/Pages/home.aspx
P.F. Chang’s
Another decent Asian restaurant located in Bellevue Square, they also can be packed in the evenings, especially on weekends. I love their gluten free lettuce wraps and flourless chocolate cake. http://www.pfchangs.com/index.aspx


Redmond
Family Pancake House

While they don't have the best service, they do offer gluten free pancakes and chicken strips. Since I have a hard time eating breakfast out, this is a nice option. http://www.familypancakehouse.com/

Seattle
Anita’s Crepes
Located in Fremont, Anita’s Crepes offers gluten free crepes. It’s a small restaurant in a home on Leary Way. Definitely call ahead and make reservations. http://www.anitascrepes.com/
Five Fish Bistro
Yippee, you don’t have to drive to Portland, Oregon for gluten free fish and chips anymore!  Five fish bistro is on Capitol Hill.  They offer gluten free fish AND chips, as well as sandwiches.  http://www.fivefishbistro.com/ffm.pdf
Blue Moon Burgers
Burgers are one of those things I have always craved since going gluten free, and I was so excited when Blue Moon started offering gluten free burgers and fries. They also make an excellent milk shake. http://bluemoonburgers.com/
Flying Apron
I’m not in love with this bakery, but if you’re in Seattle and looking for gluten free baked goods this is an option.  Their stuff has a healthy spin on it, and they tend to use a lot of bean flour which I think can have a funny aftertaste. http://www.flyingapron.com/

Monroe
Guilt Free Goodness
My favorite bakery, hands down, is Guilt Free Goodness in Monroe.  They offer gluten free breads, muffins and cookies, and they also have some vegan options.  In addition they do special orders for cakes.  http://www.guilt-free-goodness.com/

Tacoma
Friesenburgers
It’s definitely out of the way for me, but if I’m passing through Tacoma I always stop by this hole in the wall for a burger. It’s located right near the Tacoma Dome, and they make a dang good burger if you ask me.  http://www.friesenburgers.com/

Wednesday, June 6, 2012

Broccoli Casserole

I am on a quest to get my toddler to eat more veggies. 

I have been trying to make interesting, tasty dinners that have veggies in them, so he doesn’t necessarily get an option of eating them.  One of the vegetables that he doesn’t particularly care for is broccoli.  He will eat the stems in my Pan Roasted Broccoli recipe, but he won’t eat the florets, and that’s were all the good nutritious stuff is stored.

I can remember eating broccoli and cauliflower as a kid with a white cheese sauce on it, but then I think about the toddler running in circles around me at 5pm while I’m trying to make a rue at the stove and realize that white sauce is not a happening thing in my house, at least for next few years.

This recipe is an easy make-ahead casserole that is a complete meal.  I admit it’s not low cal, but I served it for the first time tonight and munchkin actually ate it. And he never eats things the first time I serve them, so I think it’s a winner!

To cut down on the prep time, I have often cooked chicken the day before or cooked, cubed and frozen the chicken.  Then when I have leftover rice, I use it up in the casserole.  This recipe also does well with the chicken omitted as a vegetarian casserole.

Note: If you’re gluten free, you’ll want to use a GF cream of mushroom soup. I like Pacific Foods, shown here.

Broccoli Casserole

2 packages of frozen chopped broccoli
2 cans cream of mushroom soup
2 or 3 cups of cooked brown or white rice (optional)
1 lb cooked chicken breast, chopped (optional)
Cheddar cheese to taste (I use 8 oz of extra sharp cheddar and 4 oz medium cheddar, use less if you don’t include the chicken and rice)

Mix all ingredients in a large bowl.  Pour into a 9 x 13 casserole pan and level.  Bake uncovered at 350 degrees for 45-60 minutes or until edges are brown and it is hot in the center.


Tuesday, May 29, 2012

White Chili with Ground Turkey and Chicken Sausage

I really wasn’t planning on posting this recipe.

Really.

It’s one of those throw together, made-up recipes that has become a staple in my house. Nothing special. Until tonight, when I decided to add kale to it since I’m trying to increase the amount of dark leafy greens my family eats.  And then my 17-month-old son actually picked the kale out of the chili and ate it.  That’s when I decided that this recipe is worth posting because if you have a toddler, you know that getting them to eat veggies is a challenge, especially something like kale.

White Chili with Ground Turkey and Chicken Sausage

1 package of ground turkey
1 package of ground chicken sausage (I like Iserno’s mild Italian chicken sausage)
3 -14 oz cans of Great Northern beans or white beans
2 onions
6 celery stalks
6 Lacinto kale leaves
1 cup chicken broth
2 tbsp cumin seed
1 tbsp coriander
3 tbsp olive oil
1/2 tsp sea salt
1 can chopped green chilies (optional)
Cheddar cheese to taste (optional)
White or brown rice, cooked per instructions

In a soup pot, brown ground turkey and chicken sausage. Chop onion and celery.  Remove spines from kale leaves and chop.  In another pan, heat olive oil over medium heat.  Add onion, celery and kale and cover. Steam/sauté for 20 minutes or until onion is clear and celery is soft, stirring occasionally. 

Rinse and drain beans.  Take one cup of beans and one cup of sautéed veggies and run it through the blender with the chicken broth until smooth. 

After the meat is cooked thoroughly, add veggies, beans, blended mixture, cumin, coriander, sea salt and green chilies to the soup pot and heat over medium-low heat until hot.

Serve with cheddar cheese over rice if desired.

Saturday, May 26, 2012

Roasted Garlic Hummus

I love, love, LOVE roasted garlic, and it’s so easy to make!  This quick, easy, make-ahead dip is great for barbeque get-togethers or, in my case, a healthy snack for my one-year-old who loves to dip things.  You will need a food processer (Cuisinart) or a Vitamix for this recipe.


Roasted Garlic Hummus
1-14 oz can of garbanzo beans
1/4 cup sesame tahini, unsalted
2 medium size heads of garlic, roasted (see below for how to roast garlic) and peeled
2 tbsp fresh sqeezed lemon juice
3 tbsp extra virgin olive oil
1/2 tsp sea salt
3 sprigs of parsley (optional)
Trim stems off parsley.  Drain garbanzo beans. Combine all ingredients in a food processer or Vitamix and blend until creamy.  Let chill before serving.

How to roast garlic:
Cut the top quarter inch off the head of garlic (the pointy end).  Place on sheet of aluminum foil, cut end up.  Drizzle with olive oil and a little sea salt.  Close aluminum foil over garlic to create a loose sealed enclosure.  Bake at 350 degrees for 45 minutes.  I highly recommend letting the garlic cool before handling it.

Monday, May 14, 2012

Easy Brined Chicken


Spring is here! Yippee!  It’s time for barbequing season to start.  This is my favorite way to cook chicken on the barbeque.  Often chicken done on the grill is dry, but this chicken is moist and yummy.  If you’re feeling adventurous, play around with the seasoning. I’ve come up with some pretty good ones just using herbs from the spice rack and whatever happens to be in my frig.
My toddler son loves chicken cooked this way too.  It never fails!
This recipe is adapted from Williams Sonoma Essentials of Roasting Coockbook.

Easy Brined Chicken
1 to 2 lbs chicken breast or thigh, boneless, skinless
1/3 cup kosher salt
1/3 cup brown sugar, packed
2 tsp celery seeds
Fresh ground black pepper to taste
1 leek, white part and 3 inches of green, cut into 1/4 inch thick slices (a chopped onoin will work too)
 4 or 5 fresh tarragon sprigs (optional)

Dissolve sugar and salt in approximately 1 quart of water completely.  Add all ingredients and marinate for at least 4 hours, up to 2 days.  Barbeque until chicken is cooked completely (170 degrees).

Saturday, May 12, 2012

Broiled Asparagus

I have asparagus in my garden, finally!  We planted asparagus three years ago, and finally this year I am able to harvest a little to eat. Of course I had to broil it because it is (in my opinion) the best way to eat asparagus.  This is a super easy recipe that our whole family, including my one-year-old son, loves.  Asparagus can take a lot of seasoning, so don’t be bashful with the salt and pepper.


Broiled Asparagus

1-2 lbs asparagus
Olive oil
Salt and fresh ground pepper to taste
Rinse asparagus and trim ends.  Lay asparagus in a single layer on a cookie sheet.  Brush lightly with olive oil.  Sprinkle with salt and fresh ground pepper, turning to coat all sides.  Move oven rack to top shelf.  Place cookie sheet on oven rack and broil, turning asparagus at least once, until asparagus turns lightly brown, or approximately 6-8 minutes. Cooking time may vary depending on the thickness of asparagus.

Wednesday, May 9, 2012

Gluten Free Chex Mix


Who doesn’t love Chex mix?  Before I went gluten free I used to buy the bags in the store all the time, especially in the summer when we went on vacation.  Since going gluten free I ‘ve realized that I still need that crunchy, salty “fix” every now and again.  This recipe definitely fits the bill!  It’s always the hit of the party, and I love making it because it always gets eaten. 


Gluten Free Chex Mix

4 cups Corn Chex
4 cups Rice Chex
3 cups gluten free pretzels (I use Glutino’s)
1 cup mixed nuts (optional)

6 tbsp butter
2 tbsp Worcestershire sauce

1 1/2 tsp seasoned salt
3/4 tsp garlic powder

1/2 tsp onion powder


Bake at 250 degrees for one hour, stirring every 15 minutes.

Thursday, April 26, 2012

Raspberry Rhubarb Crisp (Gluten-Free)


I was so excited that our rhubarb plants are almost ready to pick that I had to go buy some rhubarb to make a crisp.


This recipe is adapted from Sunset Magazine.


Raspberry Rhubarb Crisp

1 cup gluten free rolled oats
1/2 cup brown rice or oat flour
1/2 cup brown sugar
1/2 tsp ground cinnamon
1/2 tsp ground ginger
1/8 tsp salt
1/2 cup cold butter, cut into chunks
2 cups rhubarb, chopped into 1/4 inch pieces (Only use the red stalks, discard the green parts)
3/4 cup granulated sugar
2 tbsp corn starch
4 cups raspberries (fresh or frozen)
1/2 cup finely chopped walnuts (optional)
In a large bowl, gently mix together rhubarb, raspberries, corn starch and granulated sugar.  Set aside to allow the rhubarb to start releasing its juices.
Mix together oats, flour, walnuts, brown sugar, cinnamon, ginger, and salt. With a pastry blender (or your fingers), cut butter into oat mixture until it forms coarse crumbs. 
Pour rhubarb raspberry mixture into a shallow baking dish. Sprinkle evenly with oat topping.
Bake at 350 degrees for 45 minutes, until the topping is golden brown and the fruit is bubbling.

Friday, April 20, 2012

Pan Roasted Broccoli

This is my husband’s favorite way to eat broccoli and I haven’t made it since our son was born more than a year ago.  Tonight I decided to make it as a treat to my husband, and I discovered that not only my husband likes it, but my 15-month-old likes it too!  He particularly liked the stems (who wouldn’t with salt and pepper on them?).  Guess I have to make it more often. 


This recipe is originally from Cook’s Illustrated.


Pan Roasted Broccoli
1/2 tsp salt
1/8 tsp fresh ground pepper
2 tbsp olive oil

1 1/4 lb broccoli, separated into small florets, and stems, sliced


3 tbsp water (I find with my Le Creuset cookware this is enough water, if you’re using a pan with a lid that doesn’t seal as tightly add 1 tbsp more)


In a small bowl, combine water, salt and pepper until salt has dissolved.  In a large skillet, heat the oil over medium-high heat.  Add the broccoli stems in a single layer.  Don’t stir. Cook for 3-4 minutes until browned.  Add the florets and toss to combine. Don’t stir.  Cook for 1-2 minutes.  Add the water mixture, cover, and reduce heat to medium-low.  Cook for 3-4 minutes. Enjoy!

Wednesday, April 18, 2012

Gluten Free Creamy Mac ‘n Cheese


Tonight I was in the mood for some comfort food so I made mac ‘n cheese. It has been a long time since I made it! I love homemade mac ‘n cheese, so I thought I would share my recipe.


Gluten Free Creamy Mac ‘n Cheese

4 tbs butter
¼ brown rice flour
2 cups milk
½ lb Beecher’s Flagship cheese, grated
½ lb extra sharp cheddar cheese, grated
1 lb gluten free pasta – I used Trader Joe’s brown rice penne pasta

I suggest measuring the milk and grating the cheese before you start cooking, as the rue requires constant supervision.

In a sauce pan, melt the butter over low-medium heat. Add the brown rice flour to the butter while stirring constantly. Continue to stir until the butter/flour starts to bubble slightly and darken. Remove from heat and slowly add milk while continuing to stir. Once combined, return to the stove and stir constantly until the milk is hot and thickens. Add all of the Beecher’s cheese to the sauce pan with the milk and stir until it has melted.

Cook pasta as instructed on package. Once drained, coat the pasta with the sauce evenly. Put half of the pasta in the casserole dish and distribute half of the extra sharp cheddar on top. Repeat with the remaining pasta and cheese so the top is covered with cheese. Bake at 325 degrees for 45-60 minutes until heated through.

Friday, March 23, 2012

Lemon Poppyseed Coffee Cake


This is an easy coffee cake that I’ve been making recently for get-togethers. The raspberries give
it a little extra kick! This recipe came from a class I took at PCC a few years back with Johnna Dietz.


Lemon Poppyseed Coffee Cake (with Raspberries)


Cake Ingredients:


¼ safflower oil
¾ cup sugar
2 eggs (or 2 tbsp flax meal in 6 tbsp hot water. Let stand,
stirring occasionally for 10 minutes.)
3 tbsp grated lemon peel
1 cup brown rice flour
6 tbsp corn starch
2 tbsp tapioca flour
1 tsp xanthan gum
½ tsp baking powder
½ tsp baking soda
½ tsp sea salt
3 tbsp poppy seeds
2 tbsp lemon juice
2/3 cup milk (dairy,
rice, hemp, etc)
1 tsp vanilla extract
1 cup fresh or frozen raspberries


Topping Ingredients:


¼ cup brown sugar
2 tsp poppy seeds
1 tbsp safflower oil
2 tbsp brown rice flour


Preheat oven to 350 degrees.


Coat a 9 inch springform pan with oil.


Cream together safflower oil, sugar and eggs on medium speed with an electric mixer until very smooth, about 1 minute. Add lemon peel.


In a medium bowl, combine flours, xanthan gum, baking powder, baking soda, sea salt and poppy seeds. In another medium bowl mix the lemon juice, milk and vanilla.


With a whisk, beat the dry ingredients into the egg mixture, alternating with the milk mixture, beginning and ending with dry ingredients. Do not over-mix. Spoon 2/3 of the batter into the pan. Arrange the raspberries in a single layer on top of the batter, then pour the remaining batter over the raspberries (it’s ok if some of the raspberries peak through).


For the topping, combine the dry ingredients together in a medium bowl and mix in the oil with a fork (or your fingers). Sprinkle on the batter. Bake for 35 minutes or until top is goldenbrown and a cake tester comes out clean.

Saturday, March 17, 2012

Toddler Cookies


I found this recipe on Pinterest for 'Applesauce Cookies' from Shape Magazine and thought they might be good ...... but, well ...... I really did not care from them. However, they were a hit with the toddler. In hopes of making a 'better' cookie I revised the recipe and they improved in flavor and texture.


These are a great go to snack for a child, cheaper than what you can buy in the store, healthier, and easy to make. I think the most difficult part is remembering to buy bananas so they can ripen. I really don't know why they were call Applesauce Cookies since the main ingredient is bananas! I just call them Toddler Cookies - aka Grandma Cookies since I make them for the toddler.


Toddler Cookies


3 ripe bananas, smashed

1/3 cup unsweetened applesauce

1 cup quinoa flakes (if you do not have quinoa flakes you can substitute with oatmeal and process as below)

1 cup gluten free oatmeal pulsed in food processor or blender so it is not so coarse (don't over pulse or you will have flour)

1 teaspoon vanilla

1 tablespoon ground flax

1/2 cup dried cranberries (cherries/raisins or whatever you have available)


Heat oven to 350 degrees


Mix all of the ingredients together with your mixer or by hand and drop rounded teaspoon on parchment paper lined baking sheet. (Note in the picture above there is no parchment paper - these stick really bad since there is no oil in the cookie. so do yourself a favor and use the parchment paper). Slightly flatten cookie with back of spoon. Bake for 20 minutes. Cool on baking sheet for 2 minutes; remove to wire rack to cool completely.

Coconut Oatmeal Cookies (Gluten Free & Egg Free)

In honor of St. Paddy's Day, I am finally adding a post! (Though these cookies have nothing to do with any Irish theme)

These are one of the favored cookies of 'the village'. They are not too sweet but you can easily add sweetness with chocolate chips (then I call them Vacation cookies, because I make them to take on family vacations) or use sweetened coconut.


Coconut Oatmeal Cookies

2 tablespoons ground flax
6 tablespoons hot water (or you can substitute 2 eggs for the flax/water)
1 cup butter - softened
1/2 cup brown sugar
1/2 cup sugar
2 tablespoons vanilla extract
2 cups gluten free flour mix*
1 teaspoon baking soda
1 teaspoon xanthan gum
1 cup gluten free oatmeal
1 cup unsweetened shredded coconut

Preheat oven to 375 degrees
Mix together ground flax with hot water and let stand for about 10 minutes to thicken. I like to heat my water in the microwave before adding the flax because it seems to work best with really hot water. If you can eat eggs you can use 2 eggs in place of the flax & hot water.
Cream the softened butter with your mixer until light and fluffy.
Add brown sugar, white sugar and vanilla - beat until creamy. Add flax mixture (or eggs) and mix until well. (I use a stand mixer and let this run for 1-2 minutes, scrapping down the sides a couple of times to make sure everything is incorporated well).
Combine gluten free flour mixture*, baking soda and xanthan gum in a small bowl. Make sure these are mixed well before adding to butter/sugar mixture.
Gradually add flour mixture to butter/sugar and blend until well incorporated, add oatmeal and shredded coconut.
Drop by rounded teaspoon onto ungreased baking sheet.
Bake 10 - 12 minutes until golden brown. Cool on baking sheet for 2 minutes; remove to wire rack to cool completely.

If you prefer a sweeter cookie you can substitute all or part of the unsweetened coconut with sweetened coconut or/and add chocolate chips. I think these might be good with dried cranberries too but I have not tried it yet.

*Gluten Free Flour Mixture
If you have a mixture that you like you can use that but if it has xanthan gum in the mix omit from the recipe. If you do not have a mixture here is what I currently am using:
8 ounces brown rice flour
4 ounces sorghum flour
4 ounces sweet rice flour
2 ounces tapioca flour
2 ounces cornstarch
Mix together well and store in container.

Wednesday, March 7, 2012

Gluten Free Vegan Pumpkin Spice Muffins


I made these today for my son's preschool class and all the kids loved them. Don't let the lengthy list of ingredients fool you into thinking that this is a difficult recipe. It’s not, and once you make them I guarantee that they will be a hit.


2 cups brown rice flour
½ cup tapioca flour
¾ cup brown sugar
2 tsp baking soda
2 tsp baking powder
2 tsp xanthan gum
2 tbsp cinnamon
2 tbsp ground ginger
2 tsp allspice
½ tsp fresh ground nutmeg
1 tbsp dry mustard
1/8 tsp white pepper
¾ tsp pumpkin puree
2 cups pureed pumpkin
1/3 cup water
1/3 cup butter or Earth Balance margarine, melted
¾ cup honey (or agave)
1 tbsp vanilla extract
1 cup chopped pecans (optional)
½ cup raisins (optional)

Preheat oven to 350 degrees.

In a bowl, combine all of the dry ingredients (except the raisins and pecans if using). Mix well. In a separate bowl, whisk together the pumpkin puree, water, melted butter or margarine, honey and vanilla. Add the dry ingredients to the wet ingredients in two to three portions, gently mixing. Be careful not to over mix. Mix in the raisins and pecans with the last portion of dry ingredients if desired.

Divide into 24 muffin wrappers. Cook for 20-25 minutes, or until tops start to turn brown.

Original recipe by Johnna Deitz

Sunday, February 12, 2012

Not Your Grandmother’s Meatloaf


I know what you’re thinking: Meatloaf? Dry, bland, boring meatloaf? Nope, not here! This meatloaf is full of veggies, moist and very tasty.

I have a one-year-old in my house, and I am forever trying to find new and creative ways to get more vegetables into him. I don’t want to hide veggies from him, he should know what he’s eating, but I’m not opposed to making them taste like, well, not veggies. This recipe has been a hit in my household, and I hope it will be in yours too!

Note: This meatloaf recipe is almost a one-to-one ratio of vegetables to meat. If you’re looking at the ingredients and thinking to yourself, “man, that’s too many veggies for me,” then cut all the vegetable ingredients in half and keep the rest of the recipe the same.

2 onions, chopped
6 medium carrots, peeled and chopped
6 celery stalks, chopped
1/3 cup loosely packed parsley, chopped finely
3 – 4 tablespoons Worcestershire sauce
1 cup gluten free oats
1 lb lean hamburger
1 lb ground pork
1 lb (or 1 pkg) mild Italian sausage (I like Iserno’s)
Olive oil

To cut down on the prep time for this recipe, chop the vegetables the night before.

Preheat oven at 350 degrees. In a large skillet heat olive oil over medium heat. Add onions and sauté for until they start to turn clear. Add celery, carrots and Worcestershire sauce, reduce heat, cover and steam for approximately 15 minutes, or until the carrots and celery are soft. Combine all ingredients in a large mixing bowl until well combined. Place in a 9x13 inch baking pan, level with a spatula (or your hand). Bake at 350 degrees for 1 hour. Serve with gluten free ketchup.

Be prepared to have leftovers! This is a great recipe to put in the freezer for those nights when you don’t want to cook.

Monday, January 23, 2012

Split Pea Soup


Split pea soup. A winter staple. In our house, I've had to modify the traditional recipe to take out the ham hocks since they are not nitrite free. It took me a long time to figure out how to add good flavor to the soup without the ham hocks, but I think I finally got it.


Split Pea Soup (nitrite free)

6 cups gluten free chicken broth (I like Costco brand)
6 cups water
3 1/2 cups dried split peas, rinsed and drained
1 onion, chopped
6 celery stalks, chopped
6 carrots, chopped
2 lbs uncured, boneless, nitrite free ham (like Beeler's Ham), chopped

Combine chicken broth, water, split peas, onion and celery in a large soup pot. Bring to a boil and simmer for 1-1.5 hours. Blend approx half of the mixture and return to pot. Add carrots and ham. Return to a boil and simmer 30-45 minutes or until carrots are soft.

Getting Started

Gluten, eggs, soy, dairy, casein, whey, nuts, tomatoes, potatoes, eggplant, peppers, oranges, nitrites.

What is this, you ask? This is the list of allergies in our house!

What do you eat? That is always the next question. To answer it, we have decided to start a blog. Two moms, two households. One Village. We will share our favorite recipes and show you that living in an gluten free, allergy friendly house is not hard. As a matter of fact, it's fun!